Friday, October 24, 2014

Halloween Tablescape

I love to set the table for special occasions,
and for everyday.  So I am always
trying to come up with new ways to
set our table.

I love to shop the second hand stores to find new (to me)
dishes to have to set new tablescapes.

It sometimes is hard to find really good finds,
but just recently I found some black dishes.
Perfect, I thought, for
Halloween!

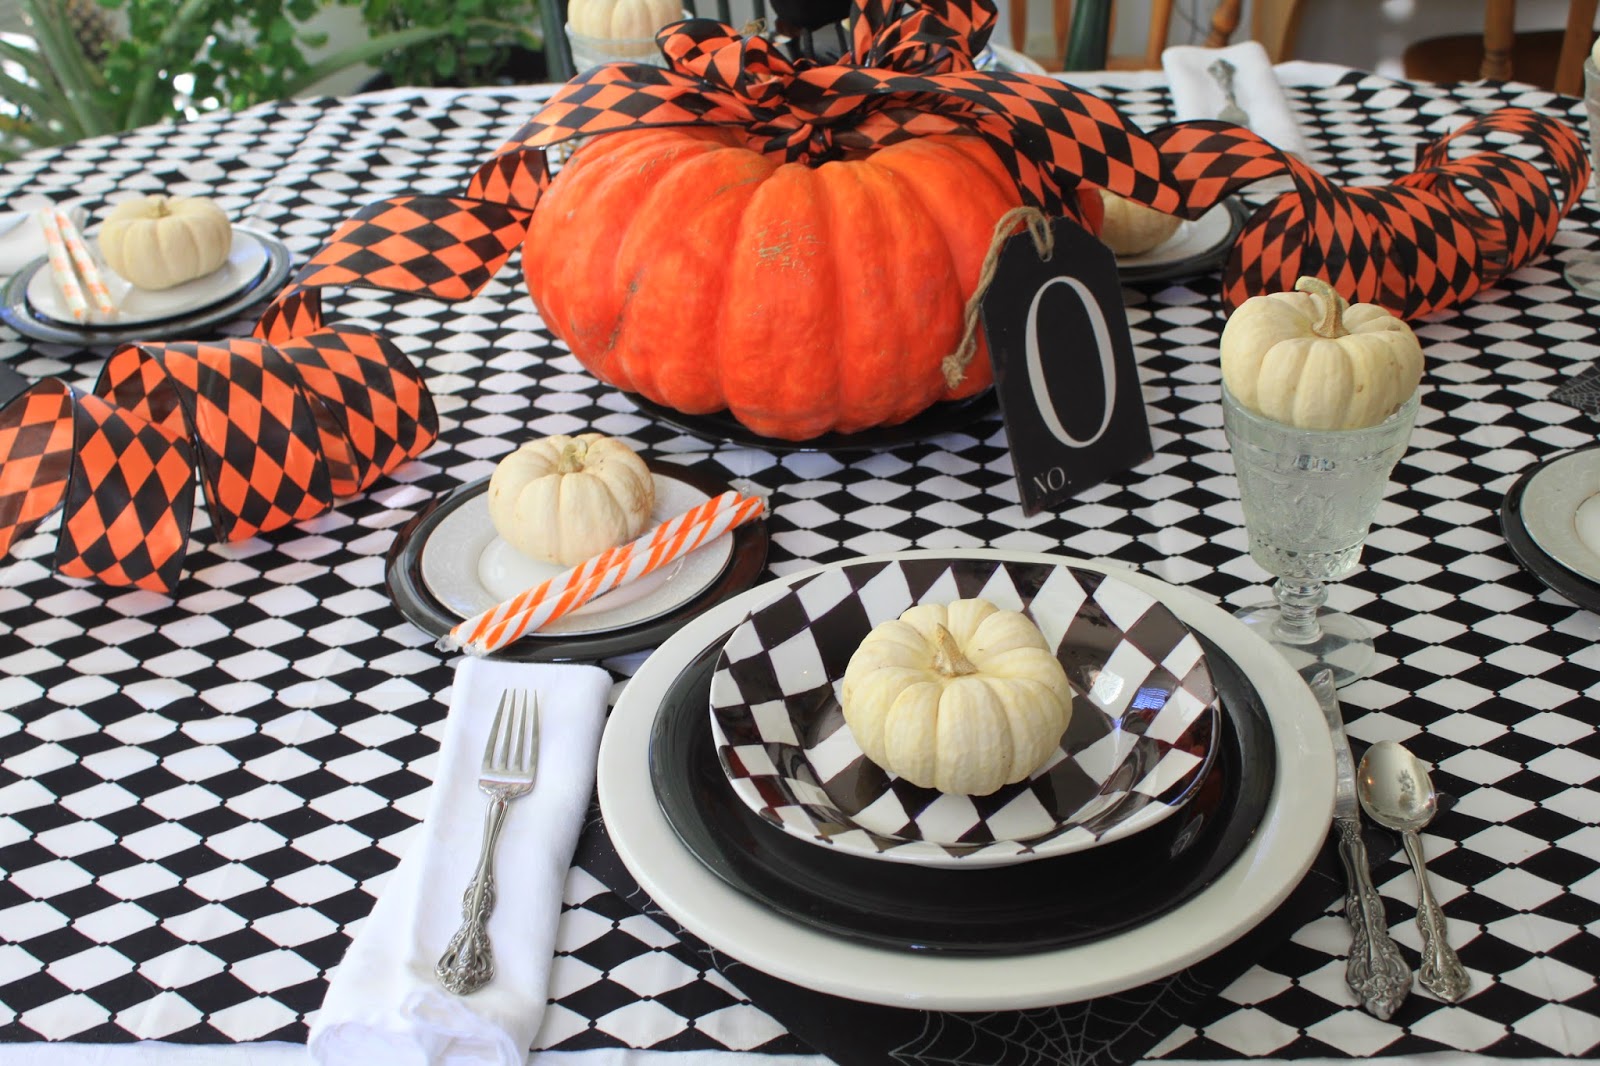
So here is my tablescape for Halloween.


I found  diamond shape fabric at JoAnns,
I just bought 2 yards and put it on top of a white 
tablecloth.
Then under each of my plates I put a sheet of 
black glitter spiderweb cardstock
found on our website


A princess pumpkin for my centerpiece on the table
topped with a black crow and black and orange diamond ribbon.


I bought 4 white plates at the dollar store and colored them in 
black felt pens to make the diamond plates.


In my garden I grew these cute mini white pumpkins.


White charger plates and black dinner and salad plates were found
at the second hand store.


I added a 'O" tag in black for O'Crowley.


The white and gray salad plate is from my mother's
china that our family would eat off on special occasions
.

This turned out to be such a cute tablescape.
It makes the kitchen/dinning area feel so festive!


Hope you have a fun Halloween.


It's just so fun to have this in the house!


See how fun just a piece of 12x12 paper can add to you 
tablescape!


Have a great October!

Ciao,

Robin


Wednesday, October 22, 2014

Halloween Tombstone Scene

Hello Robin's Nest Readers!
It's Wednesday again,
and I am sharing with you more of our
Halloween scene.

Halloween is close!

The background of our Halloween scene.


I used Haunted House Cardstock
12x12 sheet chipboard
12x12 frame sprayed black


I then added Orange 6mm dew drops
Black 6mm dew drops
Black diamond drops
Orange tear drops


a few glitter bats


and a few white pumpkins.


And here is my background to the Haunted House 
Halloween Tombstone mini book scene.


Here it is as the background of this cute Halloween scene.


Next week is our Wicked Mini book,
I honestly cannot wait to share
this with you!!!!

Find all the Robin's Nest Products on our website


Happy Halloween!

Ciao,

Robin


Sunday, October 19, 2014

Halloween Tombstone Mini Book

Hello again,
Robin's Wednesday.
Sharing the Tombstone Mini Book with you
for Halloween.

The tombstone sat on a table as I looked at it for several days
in my bedroom, I would walk by it
and think,  I have all this space between the 
fence and the stone!  What am I going to do with it?

Then the ahah moment came.

A mini book!

I wanted to have a book without rings in the binding.
So it was quite a thinking process to get to this point.  Seriously,
I'm not kidding, you probably had this figured out 
weeks ago, but me, well, it took me a while to get here.

Here is the finished book inside the Tombstone Graveyard
with the fence.


To start the book,
I traced the shape of the tombstone, then cut the bottom off shorter,
so the book is the shape of the stone, and yet you can 
see the tall stone behind the book when it sits in that open space.


Then the back of the book is also short.  It takes 3 pieces 
next to each other to create the book.  The book is cut from
black distressed chipboard. 
This chipboard comes in 12x12 sheets and you can easily
one book from one sheet of 12x12 chipboard.


Then the binding edge of the book is cut out of black bat glitter
cardstock, then both edged cut with a border punch.
These 3 pieces are glued together to form the outside shape 
of the book.


I glued with extra heavy glue tape these 4 pieces together.
This is the base for the outside of the book.


Here are all the finished pages glued to each other.
I took a 12 x12 sheet of Robin's Nest printed cardstock
and folded it in half, traced my pattern, then cut out the page
with the fold in the center of the sheet so it will open up.


This is the back side of the book with all the finished pages
 before I glued it into the base of the book.  Easy!


Here is the book with the binding base glued together.

Now,
The front cover of the Tombstone book.


I used Black Glitter Trees CS as the cover
Then cut out the Wicked from my Cricut welded the letters
together from Glitter Orange Crackle CS.
I used EK Embellishments
with Gina's Designs Doilies
Black 6mm dew and tear drops
Orange Crackle Glitter CS for the rosette
and book pages.


Here the book is sitting inside the tombstone graveyard
so you see the rosette on the book and the rosette on the graveyard fence.


Here is the binding of the book, I placed an eyelet in the edge of
the book and brought all the ribbons through the eyelet
to let them hand down the edge of the book.


Here is a video of the finished book.
My first video for the blog!
I ran out of memory on my card by the last page,
but you can see the page.

I used so many elements, made lots of tags, journaling tags,
and pockets, you need to watch the video to see 
all the fun elements of the book.


Enjoy!!!!!

Products for this book can be found on the 
Robin's Nest website.


Just look for the Halloween line.

Have a Happy Halloween season!

Ciao,
Robin

I apologize the pictures aren't that great,
only have the small camera with me today.
Here are the pages in my book,
they are shown and described much better on the
video.

Happy Halloween.


Wednesday, October 15, 2014

Our Halloween 2009

Hello on this wonderful
Wednesday morning!

Robin's Wednesday Posts

Today I have decided to scrapbook a few pictures from
years past.  Dana and I left on our mission to Africa
in 2009.  I had printed the pictures we took in the
fall, but never had time to get them onto a scrapbook page.

So I am catching up this year,
and it just brings back some wonderful memories.

The end of 2008 and  most of 2009 found our daughter in law
Robyn in our home town for the year while our son Josh
was in Afghanistan.  We created some wonderful memories that
year, at the end of 2009 Josh came back, alive I might add,
and we had about a month to share with each other 
before they moved to their new duty station, and we left for Africa.

Here are our Halloween memories for that year.

Carving pumpkins was a great evening,
and of course as you can see
STAR WARS
was the theme of the pumpkins.

I chose dark colors and papers to scrapbook these photos.
Dark because Gabe carved the Dark Syth Lord,
and Josh and Lucas carved Darth Vader.


I used the Pumpkin paper front and back
and Halloween House paper, Ghost Camo back and 
orange dew drops, and orange glitter 
chipboard.


Here the same papers, and Glitter Pumpkin Chipboard cutout.

Robyn wanted to dress up,
much to Josh's dismay.
He didn't want any nasty make up on his face,
but after much prodding, he gave in,
and we were able to take these shots.

Such a fun way to spend Halloween with your kids!

I used Brown Glitter Witch Hats for the background of these
layouts.


I also used Orange bones paper front and back,
Boo Glitter Cardstock, Halloween sticker, and
Halloween Rub on.


I used Orange Clear Scraps paint,
Halloween Glitter Words, Halloween hat sticker,
Halloween rub on, and Orange bones CS both sides.
Background is Brown Glitter Witch hats, 
and orange dew drops.

The funny story about the photo with Robyn and Dana,
is Dana had just come in the house from working in
his awesome man shed, and the back yard.
This is how he looked after work that day.

Every time I see this photo, I just laugh and laugh, and laugh!
He didn't have to dress up for Halloween that year,
it was his all day look!

Well,
I hope you have enjoyed
these very different Halloween layouts.


You can find these products on 
our website under Halloween.

www.robinsnest-scrap.com

Happy Halloween!!!

Robin

Monday, June 30, 2014

Military Photo Box for our Sons Part 1

Hi to all,
Robin here, for another fun Wednesday
Post.  I have been making a book about our sons
who serve in the Military.

I have been thinking about this box for a long time.
Saved it from years ago when we had a retail store, it was
a box that a frame came in, but didn't get used.

Here is the original box.

I looks pretty cute just the way it is,
but I wanted  to put my own twist to the box
and specialize it to represent our sons
who serve in the Army.


 Here is my new box.
I wanted to show our love of Country 
on the box, and still represent our sons.

Then I added lots of elements to the box to represent the USA,
the Army, our Name, and what we believe.


I so love the Statue of Liberty paper, because you can
use it in so many different ways.  Here I have made one of the
rectangles into a tag, then added other elements on top.
Red Stars die cut from Red Glitter Chipboard.
The small flag is a pin that I found in my mother's jewelry box.


The Silver Star is from one of our son's uniforms, 
The name embroidered O'Crowley is what is actually on each
of their uniforms they wear everyday.
The mini flag, just an old cloth flag from many years ago.
The words from the Declaration of Independence (retired Robin's Nest)


I used the brown and beige colors because they are
the colors they wear everyday to work. 
Star made from Blue diamond drops.


Here the box is open with 
the first page sitting on top inside the box.
These are our sons,
all serving in the Military as I write.
Next week, I will share with you
the pages inside my box.
and
My Tribute to our sons.

Watch for part 2 next week!

May all of you as we celebrate our Nations
birth find peace and joy and happiness.
We are able to celebrate the 4th because of 
soldiers like our sons, who served our Nation many
years ago, and today we are able to celebrate
because of the thousands of men who serve our country
every day.

A mother could not be more proud.

Happy Independence Day!

Ciao,

Robin

Tuesday, June 10, 2014

South Africa

Good Morning!
From South Africa

Dana and I have been in South Africa for over a week
now.  We currently serve for our church
The Church of Jesus Christ of Latter Day Saints 
as missionaries for the Welfare/Humanitairian Department.

Dana and I served for 2 years in Ethiopia 
as Country Directors, for the Church's NGO 
Latter Day Saint Charities while we were there for 
2 years.  We did everything from financials,
Paperwork, and finding and implementing projects there.

After we came come in Dec of 2011, 
We were called to serve as technical specialists
for the Food Production Programs throughout the world.

We are on our 3 rd year doing this, 
our first assignment was in Arizona and New Mexico 
working on projects with the Native American People.

Over the last 2 years we have been to
Projects in the US, Guatemala, Belize, and Mexico.
This is our first assignment back to Africa. 

This trip we have traveled to the Durban area
And met with a partner Enterprise Ilembe, who does 
Garden projects with local people, they 
Have are formed into coops
And they grow vegetables for the school food
Program implemented by Nelson Mandela for the
Children in South Africa for better nutrition.

This was an awesome visit, 
We see that the women are the workers and the 
Important part of keeping the gardens watered, weeded, and 
Harvested.  Every garden we visited the women's were
Going down to the nearest creek or water hole, fill their buckets
With water, and haul it up the hill to their plants.
Most of their day is spent doing this,
We are hoping that we can bring water closer to them,
By purchasing pumps, pipe, and sprinklers so they can spend
More time in caring for their plants, keeping the weeds down
Have better productivity, and become self reliant.
So they can purchase all they need on their own with out
Any assistance.

So this has been a very productive trip.
We are still waiting for the financial 
Figure from the partner, how much will it cost to
Supply the things needed, listed by the garden group,
We plan to help 7 coop groups there.

Tomorrow we leave for Madagascar, 
It is our assignment to go and see 2 food 
Projects already in process and write up a report on 
How they are doing.

We are excited to do this work!

Hugs,

Robin