Monday, November 26, 2018

Light the World

The Light the World campaign is sponsored by
The Church of Jesus Christ of Latter-Day Saints. 
It is an awesome way to give during the Christmas Season.

The challenge is to do a kind thing for someone else 
everyday in December before Christmas.

I took the challenge last year for the first time.
I'm not sure how many years the Church has been doing
this, but for me to participate last year was my first year.

It is magical, it brings the spirit of giving to a far different 
level,  It doesn't have to be anything big. 
sometimes it may be a call, or a visit,
or a text, or a plate of cookies.  Nothing big, just
the fact that you have remembered someone,
and shown love!

I made a book last year to represent each day before  Christmas.

It rejuvenated me to write down my act of kindness
to others, and it will be a journal for me in years to come.

I am sharing with you my pages today that I made
to Light the World.

Start this year to Light the World!
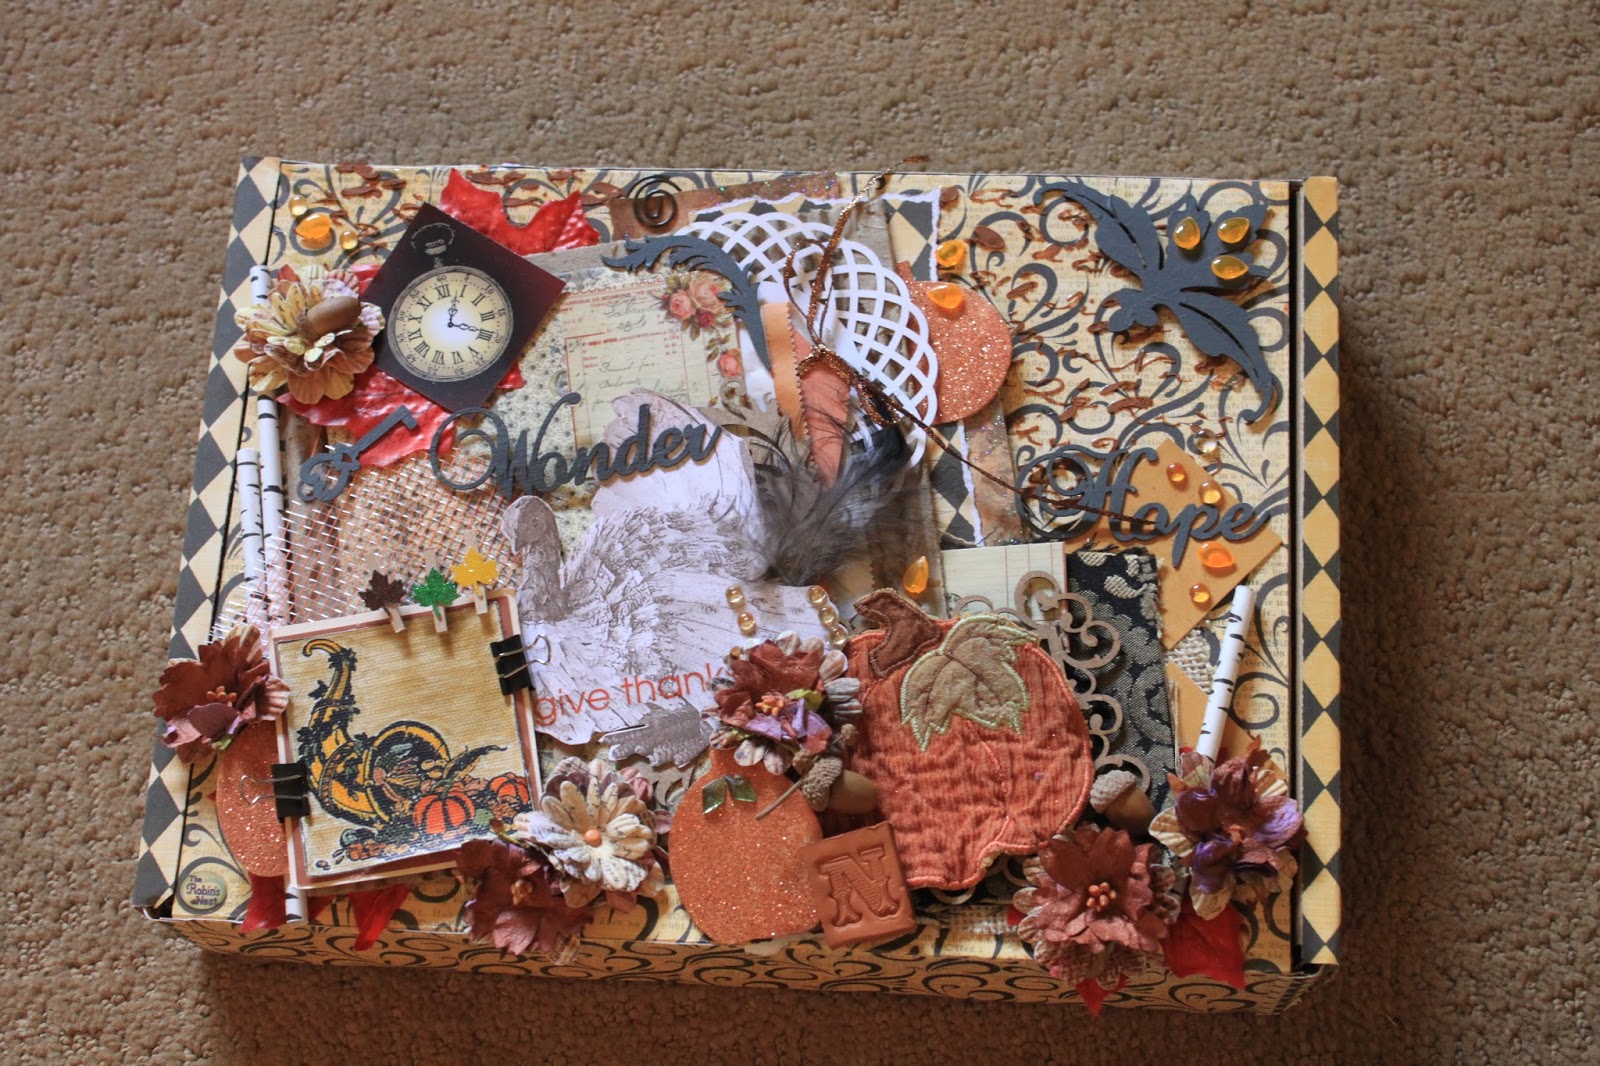
Here is my book.
This is the cover that I created.

I love that service in some way, even small ways
will bring good into the world!

25 ways in 25 days!


Day 1
Each day has a section where I can record what I did that day.


Day 2


Day3


Day 4


Day 5


Day 6


Day 7


Day 8


I will share other days as time goes on.
It is such a treasure to have this book in my home.

Each page has my recording of 2017 service for those 25 days 
last year.  

I hope you will have the desire to 
Light the World this year.

25 ways in 25 ways!

Enjoy,

Robin


Sunday, November 18, 2018

Thanksgiving Box

Preparing for Thanksgiving 
and visitors is always fun for me.
I love to be with family during this time.

This year I decided to make a box.
My Thanksgiving box is for our thoughts on
our blessings.  Each family member will
add to this either with a picture colored by little hands
or their personal take on blessings in their life.


As I was working with this box,
by the way, it is a hamburger box, When I purchase
hamburgers they come in a box, and I have been
saving boxes for a while with the plan to do something fun.
So, as I was working on this box, I decided
to bring to it a lot of collectibles that I have been saving
for many years and never use.
So as I was working on the box, I felt that the Saffron Sunrise line
would be great for Thanksgiving colors and style.


I started with Saffron Sunrise cardstock.
The yellows and deep grays are the colors I was wanting
for background colors.
So I covered the box in these papers.
I just used elmers glue to attach the papers to the box.

Saffron Diamond Cardstock  Saffron Sunrise Cardstock

Then after the papers are glued to the box,
I used dimensional paint, and painted these letters
with a plastic template.


This was so fun and easy to do, and a new
technique for me in my scrappy room.

I then started adding papers, and items.
On this box I used quite a few cut chipboard from
Gina's Designs.
Love her work!


My additions to the front of the box came from many different eras in
my life.  A piece of fabric, a pumpkin cut from an old
kitchen towel, flowers I sprayed from purple to rust,
a leather N, a feather given to me from my mother in law
at least 30 years ago, acorns from the trees in my backyard.


But most important what is on here from The Robin's Nest?

Autumn Leaves Fall Rub-on Maple Leaves Paper Clips

Turkey Canvas Turkey Glitter Cardstock  Sunkissed Tear Drops

Pumpkin Glitter Chipboard  Rusty Rose Cards Birch Tree Paper Straws

Saffron Sunrise cardstock, And dew drops and tear drops!!


I just discovered a few minutes ago that 8.5x11 paper fits inside the box!!!!

YeahHHH !!!!!

I can't wait for Thanksgiving week, when we are gathered together
with our son and his family, we will spend an evening writing our blessings
and things we are thankful for.

Have a wonderful Thanksgiving!

And as they say in Georgia,
May your life be Blessed!

Ciao,


Robin

Friday, November 16, 2018

Fall Watercolor Practice Paintings

I have been practicing my watercolor art.

Usually I paint flowers, but I took a class a few months
ago and so I tried a few different painting
which are very out of my comfort zone.


I've been wanting to paint a window with a rocks
around it.  This is my first try on this, I'm sure there
will be many more to come, but trying to get
out of my comfort zone.


Then my daughter bought a princess pumpkin while I was
visiting her, and I decided to paint it one evening.


Oh how I love how it turned out.
I must try more pumpkins when time allows.

I wish I had painted more this fall.
But alas, this with change in time.  I will
have more time in the winter.
The yard took my time this fall while 
I was back from California.

Let me know what you think of my
try at watercolor paintings.
They are not the best, but I will
continue to practice until I get  it right.

Ciao.

Robin

Sunday, November 4, 2018

How to make Velvet Pumpkins

Can you believe it is November?
I truly am in shock!  I love the fall season, it is one of my favorites,
the cooler weather, sweaters, hot chocolate, fall colors, and well
the list just goes on!

Today I am sharing with you some cute faux velvet pumpkins I made
for my home.  I looked all over for real velvet in the fall colors
but alas, there was only black and red velvet in our local
stores.  So the next best thing was to buy a velvet looking fabric
to make my pumpkins with.


I chose rust, grey, cream, honeycomb, brown, and beige.

The first thing you do is cut a round circle.
I used a charger plate as my circle, and traced around it on the 
fabric and then I cut them out.

For various sizes I used plates and bowls and traced around
them on the fabric then cut out the different sizes.


I then sewed around the edge of the fabric with a needle and heavy thread
and pulled it tight to get the shape above.


Then I filled the pumpkin with polyfiber fill and pulled the thread tight and sewed 
the circle shut.


Here are a few of the pumpkins not finished on my work table.


Now I have glued with a hot glue gun a dew drop on the pumpkin.


Here I have glued dew drops around the pumpkin, all with a 
glue gun.  Just a small dot of glue is plenty.


Then I glued a pumpkin stem on the top of the pumpkin over
the area where the pumpkin is sewed together.

I have been saving pumpkin stems for a while, because I wanted
to make these.  You could buy pumpkins from the store and use
the stem, or save your stems from this year for next years pumpkins.

I also used branches for the tops of some of my pumpkins.
I will show these in some other photos on this post.


I added ribbons, faux leaves dew drops, and old jewelry to the tops 
of these cute pumpkins.


Close ups of some, I added old crocheted doilies also to 
some of the tops of the pumpkins.


They can be displayed all over your house.
These are on the countertop in my kitchen.


And I added some of them to my china cabinet.

Such a fun way to add fall to your house,
I've wanted to make these for a few years, and finally this year
was the year.

You can find dew drops on our website

www.shop.robinsnest-scrap.net

Just click on this link and it will take you to the Robin's Nest
web page.  I used amber colored dew drops,
but other colors would be so fun also.


Happy Fall!!!

Robin